
Why Your Files Are Clean and the Site Is Still Infected
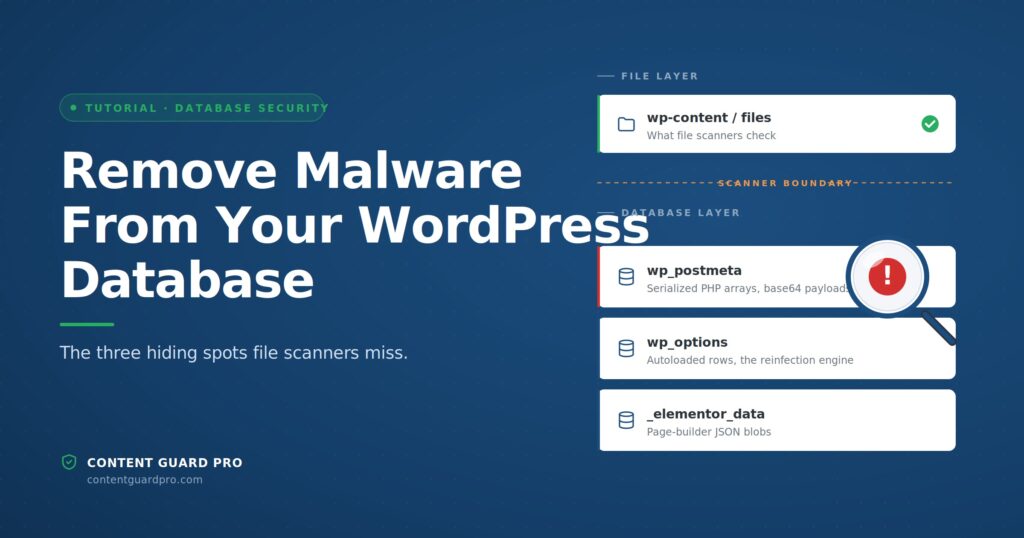
A PHP reinfector fires every time a visitor loads your site, and within hours of your cleanup it has rewritten the backdoor files you just deleted. File scanners came back green. Your backup was genuinely clean. Yet the spam is back in Search Console. The problem is structural: the infection is persisting in three specific database storage locations — serialized PHP objects buried in wp_postmeta, autoloaded payloads in wp_options rows that execute before WordPress finishes booting, and obfuscated content inside Elementor or Bricks JSON blobs — that standard regex-based scanners cannot detect because they read raw bytes without deserializing or decoding the nested payload first. This guide covers exactly where to look and what queries return signal instead of noise. Remove malware from your WordPress database by starting with this SQL:
SELECT option_name, LENGTH(option_value) AS val_length
FROM wp_options
WHERE autoload = 'yes'
ORDER BY val_length DESC
LIMIT 30;
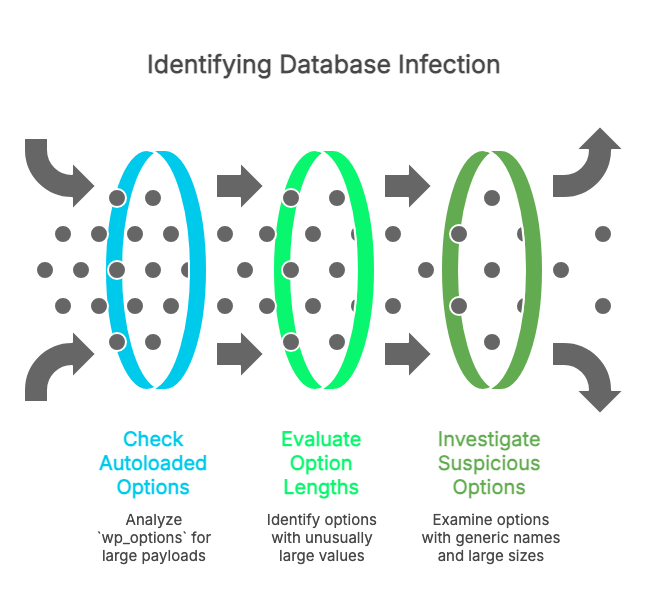
That single query won’t tell you everything, but it will show you whether any autoloaded option row is carrying an anomalously large payload — the first sign that your reinfection engine is in the database, not the file system. If the top results are rewrite_rules, cron, and widget_block, that’s normal. If you see a row named something generic like _wp_cache_data or _site_config with a value length in the tens of thousands, that warrants a closer look before you touch another file. The three hiding spots that make database-layer malware structurally invisible to file scanners each require a different diagnostic method — and that’s where the rest of this guide picks up. The starting assumption is that your file scanner is working correctly and your backup was genuinely clean. The infection simply moved somewhere those tools don’t look.
Hiding Spot #1 — Serialized PHP Strings in wp_postmeta
The query you’ve probably already run to remove malware from your WordPress database looks something like SELECT * FROM wp_postmeta WHERE meta_value LIKE '%base64%'. If it returned nothing, that’s not reassuring — it means the payload is wrapped in a layer your query can’t see through. If it returned hundreds of rows, most of them are legitimate ACF field groups, WooCommerce order data, or SEO plugin schema. Either way, the raw-byte approach isn’t giving you signal.
Here’s why. wp_postmeta.meta_value frequently holds PHP-serialized arrays — the format WordPress uses when update_post_meta() stores a complex value. A typical row looks like this: a:2:{s:4:"text";s:80:"...payload...";s:4:"type";s:4:"html";}. The outer wrapper is valid structured data. A scanner or SQL query reading raw bytes sees an array with two keys. The malicious content lives at the text key, encoded as base64 inside the serialized string. Unless the scanner deserializes that array before pattern-matching, the payload is invisible. PHP serialized data in WordPress metadata is a well-documented attack surface: CVE-2018-20148 allowed PHP object injection via crafted serialized metadata in a wp.getMediaItem XMLRPC call, and Sonarsource documented a WordPress core deserialization vulnerability in the upgrade_280() function. These aren’t theoretical edge cases — they’re documented exploitation paths through exactly this storage format.
A smarter diagnostic starts by targeting the structural markers of serialization combined with obfuscation indicators, then narrows by namespace to suppress noise:
SELECT pm.meta_id, pm.post_id, pm.meta_key,
       LENGTH(pm.meta_value) AS val_len,
       LEFT(pm.meta_value, 120) AS preview
FROM wp_postmeta pm
JOIN wp_posts p ON pm.post_id = p.ID
WHERE pm.meta_value LIKE 'a:%:{%'
  AND (
    pm.meta_value LIKE '%eval(%'
    OR pm.meta_value LIKE '%base64_decode%'
    OR pm.meta_value LIKE '%gzinflate%'
    OR pm.meta_value LIKE '%assert(%'
    OR pm.meta_value LIKE '%\x6%'
  )
  AND pm.meta_key NOT LIKE '_%' ESCAPE '\'
  AND LENGTH(pm.meta_value) > 500
ORDER BY val_len DESC
LIMIT 50;
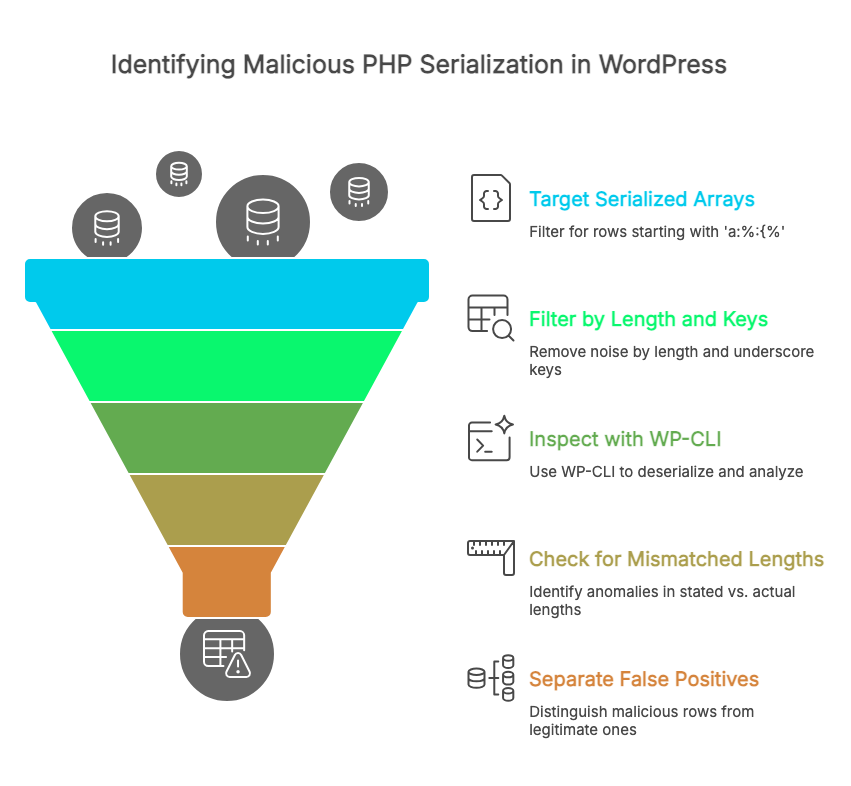
The a:%:{% prefix targets serialized arrays specifically, cutting out plain-text rows immediately. Filtering by LENGTH > 500 and excluding private internal meta keys (those beginning with an underscore, which plugin authors conventionally use for registered fields) removes a large share of legitimate ACF and WooCommerce noise before you read a single row. This is a safe SELECT — run it freely.
For anything you want to inspect properly, WP-CLI is more reliable than reading the raw preview column, because PHP handles the deserialization before your pattern-matching runs:
wp eval '
$rows = $wpdb->get_results(
  "SELECT meta_id, post_id, meta_key, meta_value FROM wp_postmeta
   WHERE meta_id IN (101, 204, 317)"
);
foreach ($rows as $row) {
  $decoded = maybe_unserialize($row->meta_value);
  echo "--- meta_id {$row->meta_id} / {$row->meta_key}n";
  print_r($decoded);
}'
Replace the IN (101, 204, 317) list with the meta_id values your SELECT returned. maybe_unserialize() is the same function WordPress uses internally, so what you see in the output is exactly what gets executed. Pay close attention to the stated versus actual string length: a legitimate serialized string reads s:80:"..." where the quoted content is actually 80 bytes. An injected payload often carries a mismatched length — s:120:"..." wrapping content that’s actually 340 bytes — because the attacker appended content after the original serialization was written. That mismatch is one of the more reliable indicators you’re looking at an injected row rather than a noisy-but-legitimate one.
For false-positive separation: ACF field groups, WooCommerce order meta, and Yoast or RankMath schema arrays are large and serialized, but their keys are namespaced consistently (_yoast_wpseo_, _wc_order_), their string lengths match their content, and they contain readable English keys throughout. A malicious row typically has an orphaned meta_key that doesn’t match any installed plugin’s documented prefix, a stated-length mismatch, and a nested base64 string longer than ~200 characters with no surrounding context — just an opaque blob sitting at a key named something generic like data or config.
Before you act on removal of malware from your WordPress database: run wp db export pre-cleanup.sql and take a file-level backup of wp-content. Deleting a wp_postmeta row that belongs to a live post can silently break its front-end render — the row may be gone but the post now has a missing field its template expects.
Hiding Spot #2 — Autoloaded wp_options Rows That Rewrite Cleaned Files
If your client’s site went clean for 48 hours after a restore and then started serving redirects again this morning, the most likely explanation isn’t a missed file — it’s an autoloaded row in wp_options that survived untouched and has been reinstalling the backdoor on every page load since the restore completed. A technical teardown of an autoload-based backdoor walks through the mechanic in detail.
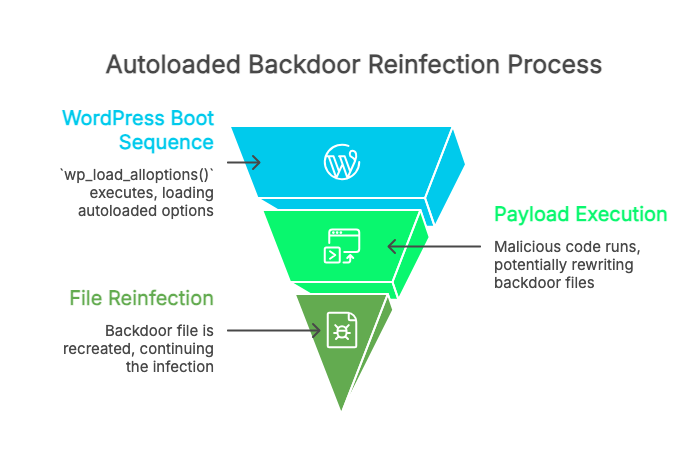
WordPress loads every row in wp_options marked autoload='yes' into PHP memory on every page request, via a function called wp_load_alloptions(). This happens early in the WordPress boot sequence — before your active theme loads, before plugins initialize, before any security plugin gets a chance to run. A malicious payload stored in an autoloaded row isn’t passively sitting there waiting to be discovered; it’s executing on every single page view. The specific capability that makes this the reinfection engine: that payload can call file_put_contents() to rewrite the backdoor file you just deleted. You clean the file, the next visitor loads a page, the autoloaded row fires, and the file exists again within seconds. The timing you observed — clean for 48 hours, then back — is consistent with a low-traffic window where the option fires less frequently before traffic resumes.
The Smart Slider 3 Pro supply-chain backdoor is the clearest real-world example of this pattern. The Hacker News, citing Patchstack research, reported that the compromised plugin stored its persistence in four named wp_options rows: _wpc_ak, _wpc_uid, _wpc_uinfo, and _perf_toolkit_source. Wiping the plugin files left the infection fully functional, because those rows were the actual persistence layer. Cleanup required deleting those specific named rows — and this is where a keyword scan for base64 or eval would have found nothing, because the option values themselves weren’t obviously obfuscated. The signal was the orphaned names: none of those prefixes correspond to any legitimate plugin installed on the site.
That’s the counter-argument to “I already grep wp_options for base64.” Keyword-based searches catch sloppy injections. Targeted campaigns store cleaner payloads under generic-looking names and rely on the autoload mechanism for execution. Size anomalies and orphaned namespaces tend to be more reliable signals than obfuscation keywords alone. Start with the size-ranked autoload query from the opening section, then work down from the top. Legitimate large autoloaded rows are named predictably: rewrite_rules holds routing data, cron holds the scheduled event queue, widget_block and similar entries hold widget configuration. These are large but readable when you scroll through the value. A malicious row tends to have a value that’s an unbroken base64 or hex string — no whitespace, no readable keys, no structure — under a name like _wp_cache_data or _site_settings that doesn’t map to any plugin currently installed.
Follow up with a second pass targeting obfuscation markers in the value itself:
SELECT option_name, LENGTH(option_value) AS val_len,
       LEFT(option_value, 200) AS preview
FROM wp_options
WHERE autoload = 'yes'
  AND (
    option_value LIKE '%eval(%'
    OR option_value LIKE '%base64_decode%'
    OR option_value LIKE '%gzinflate%'
    OR option_value LIKE '%assert(%'
    OR option_value LIKE '%str_rot13%'
  )
ORDER BY val_len DESC;
From WP-CLI, a quicker triage pass sorts by size and lets you inspect individual suspects without touching phpMyAdmin:
wp option list --autoload=on --format=table
  --fields=option_name,size_bytes --orderby=size_bytes --order=DESC

wp option get _wpc_ak
If wp option get returns a long encoded string under a name you don’t recognize, decode it before deciding: wp eval 'echo base64_decode(get_option("_wpc_ak"));' will show you what the payload actually contains.
When you’re ready to act to remove malware from your WordPress database, the sequence matters. Export the database first — wp db export pre-cleanup.sql — and take a file backup of wp-content. Then delete the suspect option: wp option delete _wpc_ak is cleaner than raw SQL because it runs WordPress’s own hooks. Only after the option row is gone should you clean or restore the file it was spawning. Reversing that order means the option fires once more during your file cleanup and recreates the backdoor before you finish.
Hiding Spot #3 — Obfuscated Payloads in Page-Builder JSON Blobs
That mobile-only redirect you noticed on a specific Elementor page — no matching content in the editor, nothing in the file scan, nothing in wp_posts — almost certainly lives inside the _elementor_data row for that post. Elementor stores its entire layout as a JSON string in wp_postmeta under the meta key _elementor_data, confirmed by a documented SQL injection proof-of-concept (Exploit-DB 51956) that directly targeted the elementor_ajax_save_builder endpoint and manipulated that meta key to inject content. The structure is real, the attack surface is documented, and a raw LIKE '%eval%' query against wp_postmeta finds nothing there — because the payload is encoded inside a JSON field inside that blob, not sitting as a bare string.
To find a payload in _elementor_data, a scanner has to do four things in sequence: parse the JSON, walk the widget tree recursively through nested innerBlocks, identify fields that carry encoded content, then decode and pattern-match the decoded output. A scanner that reads raw bytes and applies a regex skips all four steps and reports the row as clean. Patchstack documented exactly this surface when researching Elementor’s save_base64_to_tmp_file function — an endpoint that accepted base64-encoded file content and wrote it to disk, fully patched in version 3.18.2 with added file type and name checks. That specific CVE is patched, but the structural detection problem is independent of any single vulnerability: whenever an attacker writes encoded content into a Custom Code or HTML widget field, the storage format itself makes conventional scanning blind to it.
Start the diagnostic by finding which pages carry the largest builder payloads. This is a safe SELECT:
SELECT post_id, LENGTH(meta_value) AS data_len
FROM wp_postmeta
WHERE meta_key = '_elementor_data'
ORDER BY data_len DESC
LIMIT 20;
Compare the top results to your site’s typical page complexity. A contact page or a three-section landing page shouldn’t have a _elementor_data blob substantially larger than similar pages in the list. The specific page showing the redirect is the first candidate to inspect. Pull the raw JSON and pipe it through a formatter:
wp post meta get 42 _elementor_data | python3 -m json.tool | lessScroll through the widget tree looking for HTML widgets or Custom Code elements. Three patterns indicate something worth decoding: a base64 string longer than roughly 200 characters in a settings field, a <script> tag pointing to an unfamiliar third-party domain, or unicode-escaped characters that spell out a function name — for example, u0065u0076u0061u006c decodes to eval. Attackers use that escaping specifically because it passes through keyword-based scanners without a match.
For a batch pass across a portfolio, a short wp eval-file script can walk every _elementor_data row, extract all string-type widget settings fields longer than 200 characters, attempt a base64 decode on each, and log any decoded output containing eval, atob, Function(, or external domain references. That’s more reliable than manual inspection when you’re covering twenty-plus client sites.
If you’re managing sites built on Bricks Builder, the same JSON-in-postmeta architecture appears to apply — but the exact meta key varies by version, and no publicly confirmed source pins a single canonical key name. Before writing any query, run SELECT DISTINCT meta_key FROM wp_postmeta WHERE meta_key LIKE '_bricks%' LIMIT 20; against the specific site to confirm what key name Bricks is actually using in that installation.
False-positive separation matters here because Elementor legitimately stores small inline SVGs and occasionally base64-encoded font subsets in widget settings. These are typically short — under 100 characters — and decode to readable XML or binary font data. A long base64 string inside an HTML widget that decodes to a JavaScript function calling an external domain, or to PHP that evaluates a further-encoded string, is not an inline icon. The combination of widget type (HTML or Custom Code), field length, and decoded output type is what distinguishes noise from an actual payload.
SEO Spam Patterns That Live Only in the Database
The reason your client keeps getting fresh spam pages indexed after you’ve removed them twice comes down to a structural mismatch: you’ve been cleaning the artifacts while the controller stays running. Japanese keyword hack and pharma hack campaigns are specifically engineered to survive artifact-only cleanup, because their visible layer — the spammy indexed pages — is generated on demand by a database-resident controller, not baked into static files you can simply delete.
The cloaking behavior is what makes this class of infection so damaging before anyone notices it. Japanese keyword hack SEO spam is typically hidden from human visitors and visible only to search engine crawlers, which is why ranking damage can precede any visual symptom by weeks. You can load the infected page in Chrome and see the client’s normal content. Google’s crawler loads the same URL and sees a page full of pharmaceutical terms or Japanese commercial text. To confirm which version Googlebot sees, use Google Search Console’s URL Inspection tool, click “View Crawled Page,” and compare the rendered output to what your browser shows. A mismatch there is definitive evidence of active cloaking — and it tells you the payload is user-agent-aware, which means there’s decision logic running somewhere.
That decision logic often lives in wp_postmeta. Serialized meta values on the affected posts can carry the cloaking rules — a PHP-serialized array that checks the incoming user-agent string and returns different content depending on whether it matches a list of known crawler signatures. Cleaning the post content in wp_posts leaves this conditional logic intact and attached to the post record. The next time the campaign’s controller republishes spam content, the cloaking rules are already in place and ready.
The controller itself typically lives in wp_options, autoloaded, executing on every page request. Cleanup documentation for the Japanese keyword hack has identified wp_options entries with names like base64_code as indicators of infection, though specific option names vary by campaign. When an option like that is autoloaded, it can make an outbound request to a remote server, retrieve a fresh batch of spam content, and write new posts to wp_posts — all within a single page load. That’s the mechanism behind the pattern you’re seeing: you delete the spam pages on Tuesday, and by Thursday Search Console has indexed three new ones. The posts are being regenerated, not cached.
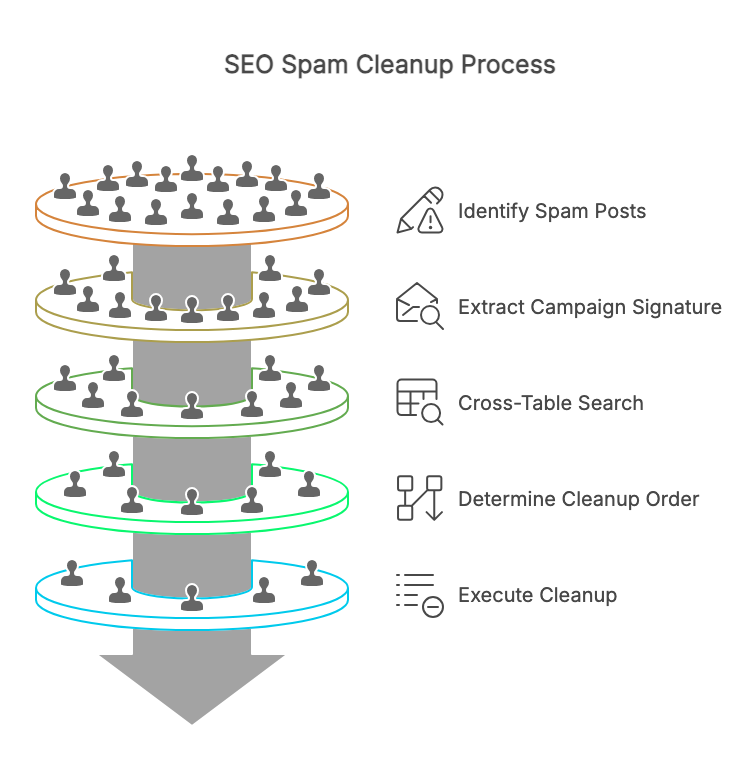
The detection sequence for this campaign architecture starts with the posts themselves, then traces backward to the controller. First, find recently-modified or auto-published posts that don’t look like anything the client created:
SELECT ID, post_title, post_status, post_modified, post_author
FROM wp_posts
WHERE post_modified > DATE_SUB(NOW(), INTERVAL 14 DAY)
  AND post_type = 'post'
  AND post_author NOT IN (
    SELECT ID FROM wp_users WHERE user_registered < '2020-01-01'
  )
ORDER BY post_modified DESC
LIMIT 30;
Adjust the date and the user-registration threshold to match your client’s site history. Posts with unfamiliar post_author values or a post_status of publish that the client didn’t write are your starting artifacts. Next, look for a shared campaign signature — often a recurring external domain embedded in the spam content. Once you have a domain string from one of those posts, run a cross-table search to find every location the campaign has touched:
SELECT 'wp_posts' AS source_table, ID AS row_id, post_title AS label
FROM wp_posts WHERE post_content LIKE '%examplespam-domain.com%'
UNION ALL
SELECT 'wp_postmeta', meta_id, meta_key
FROM wp_postmeta WHERE meta_value LIKE '%examplespam-domain.com%'
UNION ALL
SELECT 'wp_options', option_id, option_name
FROM wp_options WHERE option_value LIKE '%examplespam-domain.com%';
Replace the domain placeholder with whatever external domain you extracted from the spam posts. The results map exactly which of the three hiding spots this particular campaign is using — and they tell you the cleanup order: delete the wp_options controller row first, remove the wp_postmeta cloaking logic second, then delete the generated posts. Reversing that order means the controller fires during your cleanup pass and starts regenerating content before you’re finished. Export the database with wp db export pre-cleanup.sql before any deletes, because the cross-table query above will show you rows you’ll want to reference if something breaks during cleanup.
A Grounded Next Step
If you have two sites at the top of your risk list tonight, the queries in this guide give you a real diagnostic picture in roughly 15 minutes per site. Run the autoloaded wp_options size-ranked query first — it’s the fastest single signal for the reinfection engine. Follow it with the _elementor_data length query if those sites use Elementor, then the serialized wp_postmeta query filtered to a:%:{% plus obfuscation markers. Between those three passes, you’ll have covered all three structural hiding spots with nothing installed and nothing purchased.
Most of what those queries return will be legitimate. The genuinely suspicious rows tend to announce themselves through one of three patterns: a value length that’s an order of magnitude larger than its neighbors in the same column, an option name or meta key that doesn’t correspond to any installed plugin’s documented prefix, or a decoded value that’s an unbroken encoded string with no readable structure around it. When all three signals land on the same row, that’s your candidate — not a definitive finding, but a row worth examining before you dismiss it.
The file-layer scanners you’re already running — Wordfence, Sucuri, MalCare, Patchstack — should stay in place. They cover their layer well, and the gap this article describes isn’t a quality problem with any of them. It’s structural, as covered up top: a different scanning problem requiring a different approach, not a reason to replace anything you have.
The honest question for the other 28 sites on your list is whether the manual SQL path is sustainable at that scale. Running three diagnostic queries per site, evaluating the results, and tracking findings across a rotating client portfolio takes time that compounds quickly. That’s the specific scenario where a database-aware scanner earns its place alongside your existing tooling — not as a replacement, but as the layer your current stack doesn’t reach.
Content Guard Pro’s free version on WordPress.org includes a Quick Scan covering wp_posts, which is a reasonable no-commitment baseline for any site where you want automated detection of surface-level database injections. Standard Scan, available in the premium tier, extends that coverage to wp_postmeta, selected wp_options data, and Elementor layout data, with multi-layer decoding for Base64, ROT13, hex, and other common obfuscation schemes — the same structural hiding spots the queries in this guide target manually. Scheduled scans mean those checks run across your portfolio on a cadence you set, with confidence scoring (0–100) and severity classification so you’re triaging Critical and Suspicious findings rather than reading through every flagged row yourself. Non-destructive quarantine neutralizes a payload on render while preserving the original database content, so if a finding turns out to be a false positive, the rollback is one click rather than a manual restore from the export you took before cleanup.
Start with the two highest-risk sites tonight. Run the queries, export your database before touching anything, and let the actual findings guide whether automated coverage across the rest of the portfolio makes sense. The queries are the right first move regardless of what tooling you add afterward.
Run the Three Diagnostic Queries Tonight
The autoloaded wp_options size-ranked query from the opening section is the fastest single indicator of whether your reinfection is database-resident. Follow it with the _elementor_data length query if your client uses Elementor, then the serialized wp_postmeta query filtered to a:%:{% plus obfuscation markers. Between those three passes — no plugins, no purchases, roughly 15 minutes per site — you will have covered all three hiding spots.
Export your database with wp db export pre-cleanup.sql before you delete anything. Most rows will be legitimate noise. The genuinely suspicious ones tend to announce themselves through one signal: a value length that is an order of magnitude larger than its neighbors, an option or meta key that does not correspond to any installed plugin’s documented prefix, or a decoded value that is an unbroken encoded string with no readable structure. When all three land on the same row, that is your candidate for closer inspection.
Your file-layer scanners stay in place. The gap is structural, not a quality failure. Different scanning problem, different approach. The honest scaling question for the other sites on your list is whether three manual diagnostic queries per client is sustainable. When it is not, database-aware scanning tooling earns its place alongside your existing stack — not as a replacement, but as the layer your current tools do not reach to remove malware from your WordPress database.